

A shadow box of silvery paper frames a lovely snow queen with her pet unicorn. The image, Calling for Snow by Ching-Chou Kuik, was a given a way free as part of the Kit and Clowder Advent Calendar 2016 on Facebook. I painted the image with Distress Inks as watercolours and created a shadowbox for the frame.
The steps in "Putting It Together" (LOTS of them) go through some of how I painted the image and steps I used to make the shadowbox frame.
Challenges
Kit and Clowder Facebook group: Painting ChallengeScor-Pal: Anything Goes + More than one Score
Simon Says Stamp Wednesday challenge: Make It Sparkle
Emerald Creek Dares: Winter Wishes
The Crafty Addicts: Let It Snow
More Mixed Media challenge: White
Tuesday Throwdown: Anything Goes
Penny's Paper-crafty: Anything Goes
The Paper Shelter: Anything Goes
Crafting From the Heart: Anything Goes
Through the Craftroom Door: Anything Goes
Inspiration Destination: Anything Goes
Crafty Gals Corner: Anything Goes
A Bit More Time to Craft: Anything Goes
Supplies


As noted above, the image was a freebie for one of the days on the Advent calendar, sponsored by Ching-Chou Kuik. The image is a "digi" or "digital stamp", a line drawing that can be coloured either on a computer or on paper after being printed out.

My medium of choice is water based, Distress Ink minis. Thus, I have to make sure both the paper the digi is printed on can handle water-based colouring but also that the ink from the printer doesn't run or bleed into the colours. I trim 90 lb watercolour cardstock to 8.5" x 11" sheets (our printer doesn't support other paper sizes). I use Photoshop to 'place' images on to a 'canvas' of 7.5" x 10" (printing adds a 1/2" margin all the way around). After I print the images I spray the sheet with hairspray to "fix" the ink. I then let it dry for several hours, usually overnight in the garage since I can't stand the smell of the hairspray. I then trim between the printed images, ready to paint.
I use water brushes to paint with the Distress Ink that I smush on to a thick plastic divider sheet. I pick up the colour with the brush and generally paint on to dry paper, almost in the same way markers are used for other colouring. For some effects, I will dry a painted area to paint on top without the colours blending. For other effects, I will use a clean brush to lift surface colour to a lighter colour below. With watercolours, and water-reactive inks link Distress Ink, you can use one colour both light and darker with the amount of water in the brush or applied to the paper before painting.

For Caucasian skin, I usually use Antique Linen or Spun Sugar (adult vs child) and Tattered Rose with Victorian Velvet as the shading. This time, though, I wanted the skin to have a slightly blue-ish cast so I used Antique Linen as a base then coloured over that with a wash of Tumbled Glass. I thought about the blue in the skin after I had painted the base of Linen, so in the upper right corner you can see where I experimented to see if it was going to work, if the Glass and Linen weren't going to just go to mud. I used Dusty Condord as shading before using Tattered Rose. I am absolutely thrilled with how the skin turned out.
Keeping with the cool colours, I painted a base colour for her hair using a wash of Tumbled Glass. I also painted her lips and eyes with the same blue and darkened the pupils with Black Soot. I wanted the hair base to dry thoroughly before adding more colour, so it was the last thing I did before going to bed.

To the Tumbled Glass, I added Broken China, Stormy Sky, Faded Jeans, Chipped Saphire, Dusty Concord, and Seedless Preserves to her hair, lips, and eyes. Well, not all of those to the eyes and lips, but in that group of colours. Colouring the hair, I use techniques similar to those I have seen used with Copic markers, adding colour in small flecks of a mostly dry brush over dry base. After painting and blending dark colour over light, I will use a slightly damp brush to lift some of the dark to bring more light out. I'm getting better at it. I need to get batter at light source *laugh*

I painted her robe and top with purples, Milled Lavender and Seedless Preserves, and white, Weathered Wood for shading and Picket Fence. I painted her pants silvery grey with Weathered Wood shaded with Hickory Smoke and accented with Seedless Preserves shaded with Dusty Concord. I also added touches of greens to the trees and holly greenery (Shabby Shutters, Peeled Paint, and Pine Needles) and browns to the wood and twigs (Vintage Photo, Gathered Twigs, and Ground Espresso). I also added snow shading to the background with Weathered Wood. And then I had to go to bed.

I shaded the white of the unicorn with Milled Lavender and Dusty Concord and coloured the main with Milled Lavender, Broken China, and Tumbled Glass with the hooves of Mermaid Lagoon and Chipped Sapphire and the horn of Weathered Wood, Hickory Smoke and Tumbled Glass. I added in berries and her earring in reds (Worn Lipstick, Barn Door, and Aged Mahogany) as contrast to all the blues and purples. I used Fossilized Amber on the moon and stars. The candles are Weathered Wood with flames of Fossilized Amber with Barn Door. I used touches of Milled Lavender and Tumbled Glass on the bubbles. Painting all done.

To add sparkle and gloss to a few place, I used Wink of Stella and Stickles. Stardust Stickles to the bubbles, Christmas Red Stickles to her earring, and Wink of Stella on the bands in her hair, the suns and moons, the candles and flames, and the unicorn horn. I also added Glossy Accents to the unicorn hooves and horn.

I trimmed the image and matted it with Not Quite Navy. I decided to make a shadowy box with a shimmery silver white 12" x 12" sheet lined with an embossed pearl scallops sheet.

So now to make my first shadow box... I watched a couple videos and missed a crucial step on my first two attempts *laugh* After putting it together successfully on test sheet, I did it once more with the silver white sheet and documented the steps. I'll point out the step I missed.
I have an older version of the Scor-Pal that doesn't have score lines as frequent as the modern ones, but it still works well when using the lines it does have.
These directions make a 9" x 9" shadow box with a 1/2" frame and 8" x 8" interior using a 12" x 12" sheet (the whole sheet).

Determine the top and bottom of the sheet to be used for the shadow box. Lay the sheet top side down. On each side, score ad 1/2", 1", 1 1/2", and 2". Four score lines on each side.

One one side, score at 2 1/2" but only up to the second score line. This small score is crucial and I missed it twice. Unless you have this score, the shadow box will not work. On the same side, score at 9 1/2" with the same short score (in to the second score line).

Repeat on the opposite side, a short score at 2 1/2" and 9 1/2".

I'm drawing the cut lines with pencil to make them obvious. Since the pencil marks are on the inside, they won't show. You can just cut without drawing the lines. Draw up the short score line.

Draw diagonally from the top of the short line to the other side of that square.

Draw up one square to the centre, inner-most corner of the score lines.

Draw from the centre point to the outside following the score line.
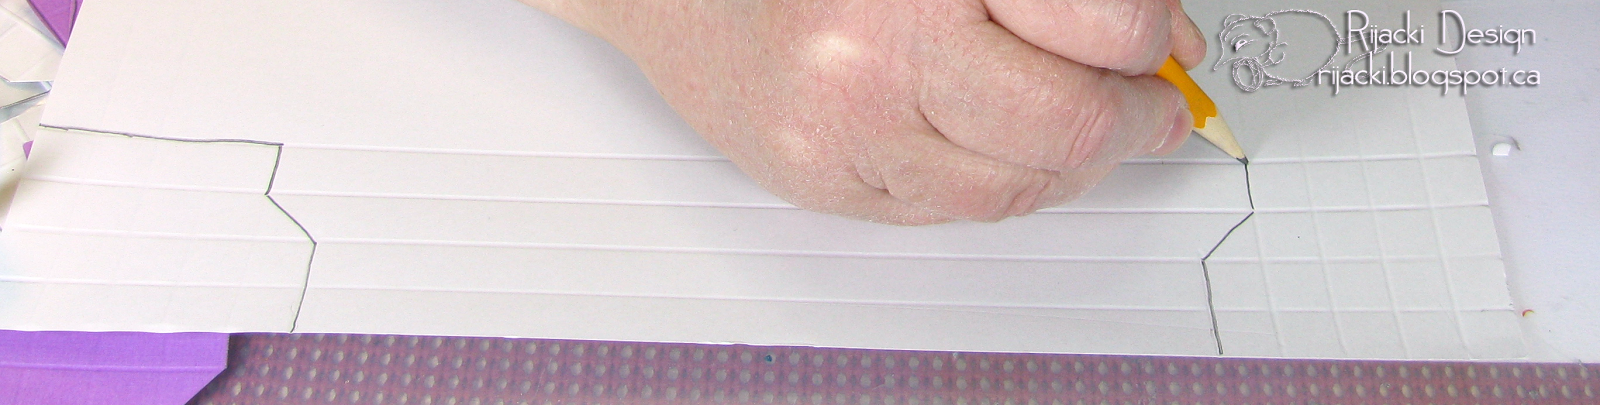
Repeat in mirror on the other corner of the same side.

Repeat on the corners of the opposite side.

Cut on all the drawn lines.

Fold in all the score lines using a bone folder to make the folds crisp.

Flip the box so the outside paper is on the top.

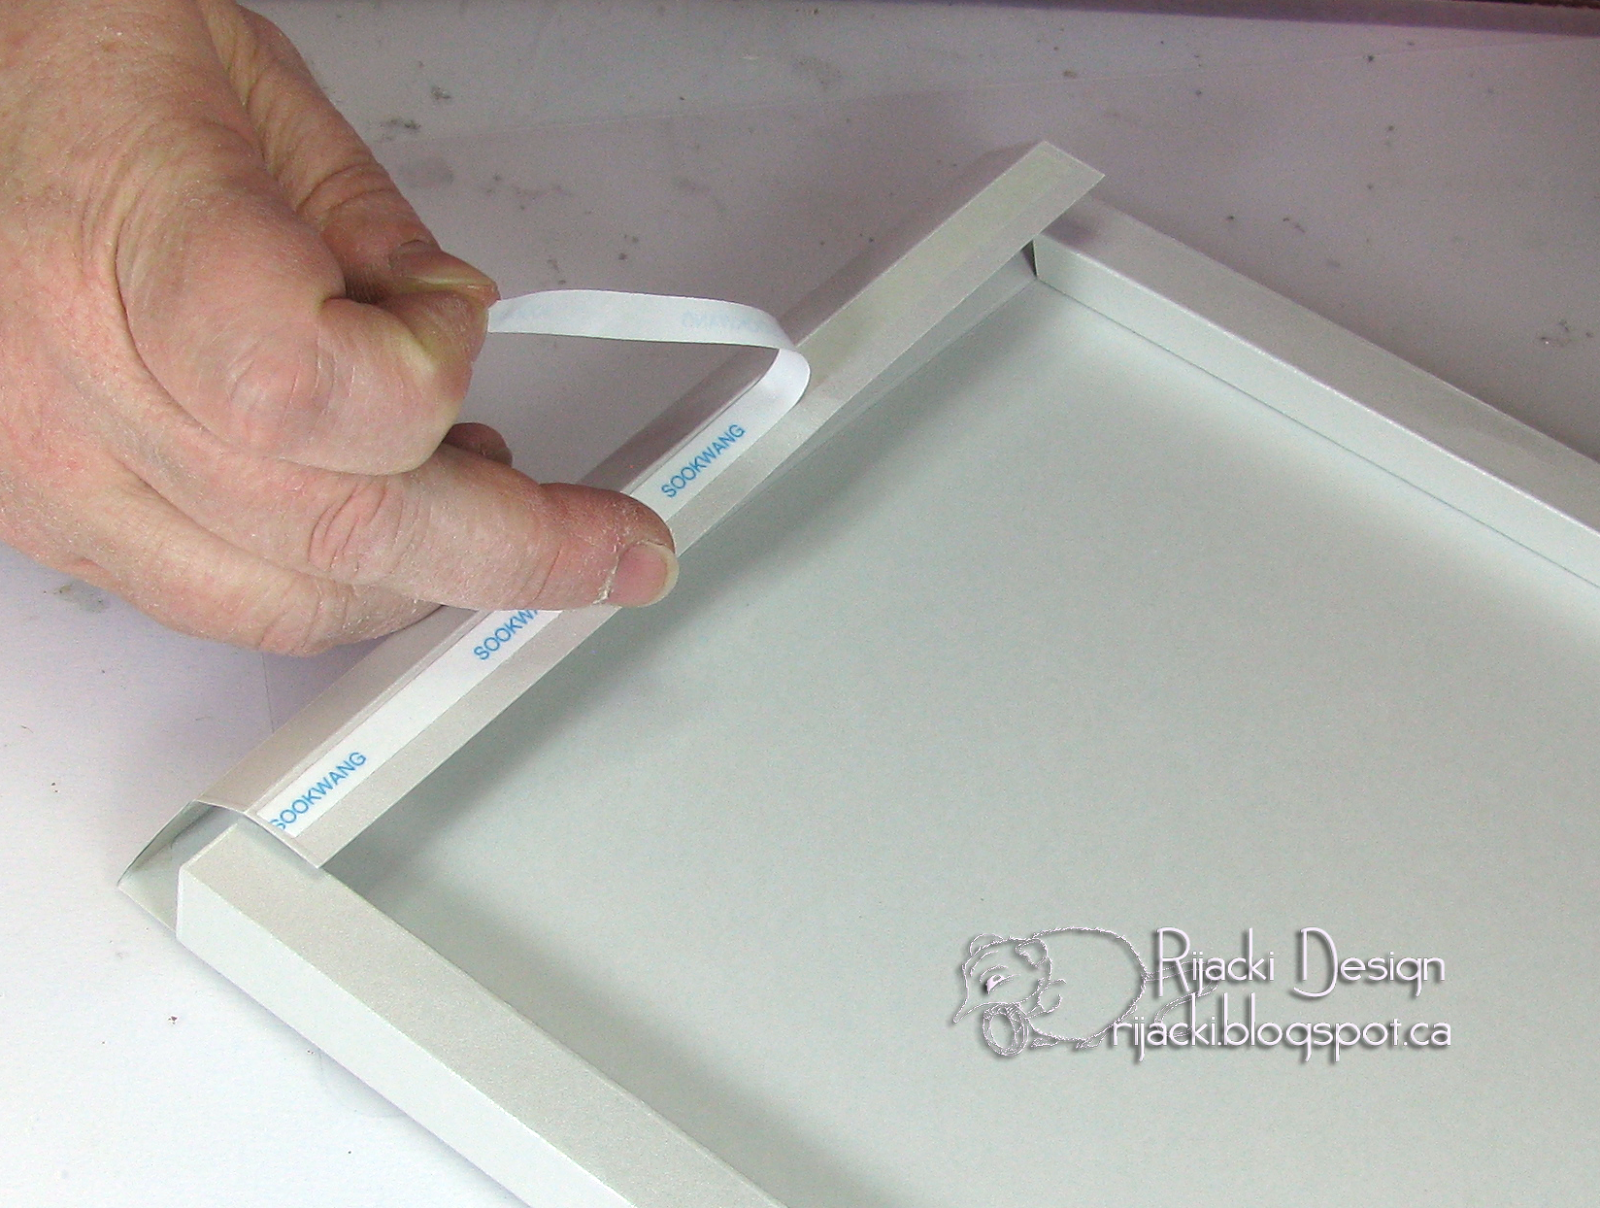
Add a strip of adhesive tape on the first 1/2" strip up against the score line. Repeat on all four sides. It's better to use adhesive tape than tape runner because the adhesive tape is covered with a release strip which makes it easier to control what's sticky at any time.

Using a bone folder, burnish the adhesive tape to make sure it's firmly adhered to the sheet.

Flip over the sheet and add a short bit of the adhesive tape to each inside diagonal. This is the underside of the 'miter' when the shadow box is assembled.

On one of the long sides, a side with straight cuts in the corner, fold the side in half at the 1" score.

Remove the adhesive tape from that side alone.

Fold over the rest of the side at the 2" line.

Fold the side over the centre and press down.

Rock the side up to create the squared tube.

Repeat on the opposite side. These are the easy sides.
Remove the adhesive from one of the remaining sides and both of the diagonals on that side.

Roll the side in a square tube being careful not to touch the paper with the exposed adhesive until you have the roll in place.

Press in each corner at the diagonal and along the top to push the adhesive against the paper.

The shadow box is done. And, it was at this moment I realised I meant to put the backing paper on the inside of the box before making the sides. Oops. It would be cleaner to put in a backing paper and assemble the sides over it, but...

I trimmed the inside backing and used tape runner to fix it in place inside the shadow box. Then I put the image in place with tape runner to finish.

Now I just need to figure out how to hang it on the wall. It's lightweight and paper, so even heavy duty removable adhesive could work.
She is beautiful, gorgeous colouring and the box frame looks great.
ReplyDeleteThank you for sharing with us at Simon Says Stamp Wednesday Challenge. Happy Holidays x
This is absolutely stunning. Loving the image and your colouring is amazing.
ReplyDeleteThanks for joining us over at Penny's.
Jean DT xx
Lovely card Rijacki, thanks for joining us at Inspiration Destination and good luck. Wendy DT xx
ReplyDeleteThis is great! Hope you have had a wonderful Christmas? Thanks for joining us at TTCRD xx Jan DT
ReplyDeleteBeautiful shadow box! Great tutorial! Thanks for joining us at Crafty Gals Corner!
ReplyDeleteLovely work. Thank you for joining the challenge at More Mixed Media and A Bit More Time to Craft. Hope to see you again next time.
ReplyDelete