Each of the digital cutters has it's own application for importing and manipulating images, creating projects, and starting the processes on the machine. The Cricut Maker uses Design Space. The applications for Sillhouette and Brother likely have similar features but have their own way of doing them.
In Design Space, you need to upload the PNG file from your computer. Be sure to use the PNG with a transparent background and not the original JPG with white background. Once the image is uploaded, it can be inserted into the project canvas. Select the image and Insert.
In the canvas, it can be resized or turned or combined with other images and/or shapes. For the Foil Quill (or marker) you want to select Draw as the Linetype before clicking the Make It button.
The first step of Make It is prepare. You can reposition the image on the mat. Sadly, this repositioning is not saved with a project. Cricut Design Space assumes you will want to have your materials in the upper left corner. Just move the image where you want the draw or cut to occur. You can also resize and re-orient the image on the mat step. If you want to flip it horizontally, select Mirror.
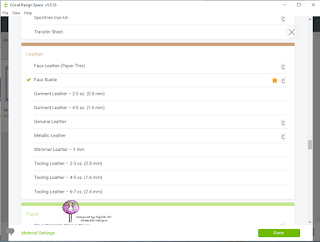
When you have the image where you want it on the mat and click Continue. In the next step, you'll need to select the material. I'm not sure (yet) how much the material selection here affects the draw, but it definitely affects a cut. For the Arches paper, I used 140 GSM Watercolour Paper. For the vinyl faux leather, I chose Faux Leather. There are a lot of material types available for the Maker. On the next step, it will tell you what items you need in the blade holders for your material especially when you're cutting.
Before continuing, I needed to prepare the actual mat. I made sure my material was no bigger than the mat (I currently only have the two 12x12" mats that came with it with a 12x24" on order now) and pressed it down. I then cut a piece of foil to cover the area that would have the draw and used washi tape to hold it down on all four sides. Oh and I plugged in the Foil Quill back up there before I started working on the image in Inkscape to make sure it had time to warm up :) The Foil Quill goes into the pen spot. Foil Quill works with each of the digital cutters with a different cowling to fit the pen spot.
Put the mat in place, click Continue on the Design Space, click the mat load button on the machine, click the Cricut go button on the machine, and wait.... Either get mesmerised by the way the image is being drawn on the foil or go do something else. The more complicated the image, the longer it will take. (I suggest doing a test run of the foil on a scrap of the material if you're not 100% sure it will work on it.) As a side note, I keep the USB cable of the Foil Quill out of the way by draping it over the open lid of the Maker. The Quill can move freely and no risk of the cable getting in the way.
After the drawing is done, you can see where the Quill did its work.
And then the reveal... I love peeling off the foil for the magic surprise.
I use a soft brush to brush away any loose foil bits 'cause I completely forgot to move the 'star rings' to the side before starting to foil. Any of the foil that didn't get heat won't stick. The foil that was heated won't rub off.


No comments:
Post a Comment
Thank you for your comments. I do read every one. Your comments help me to grow as an artist. It warms my heart to see wonderful comments and constructive criticism.