
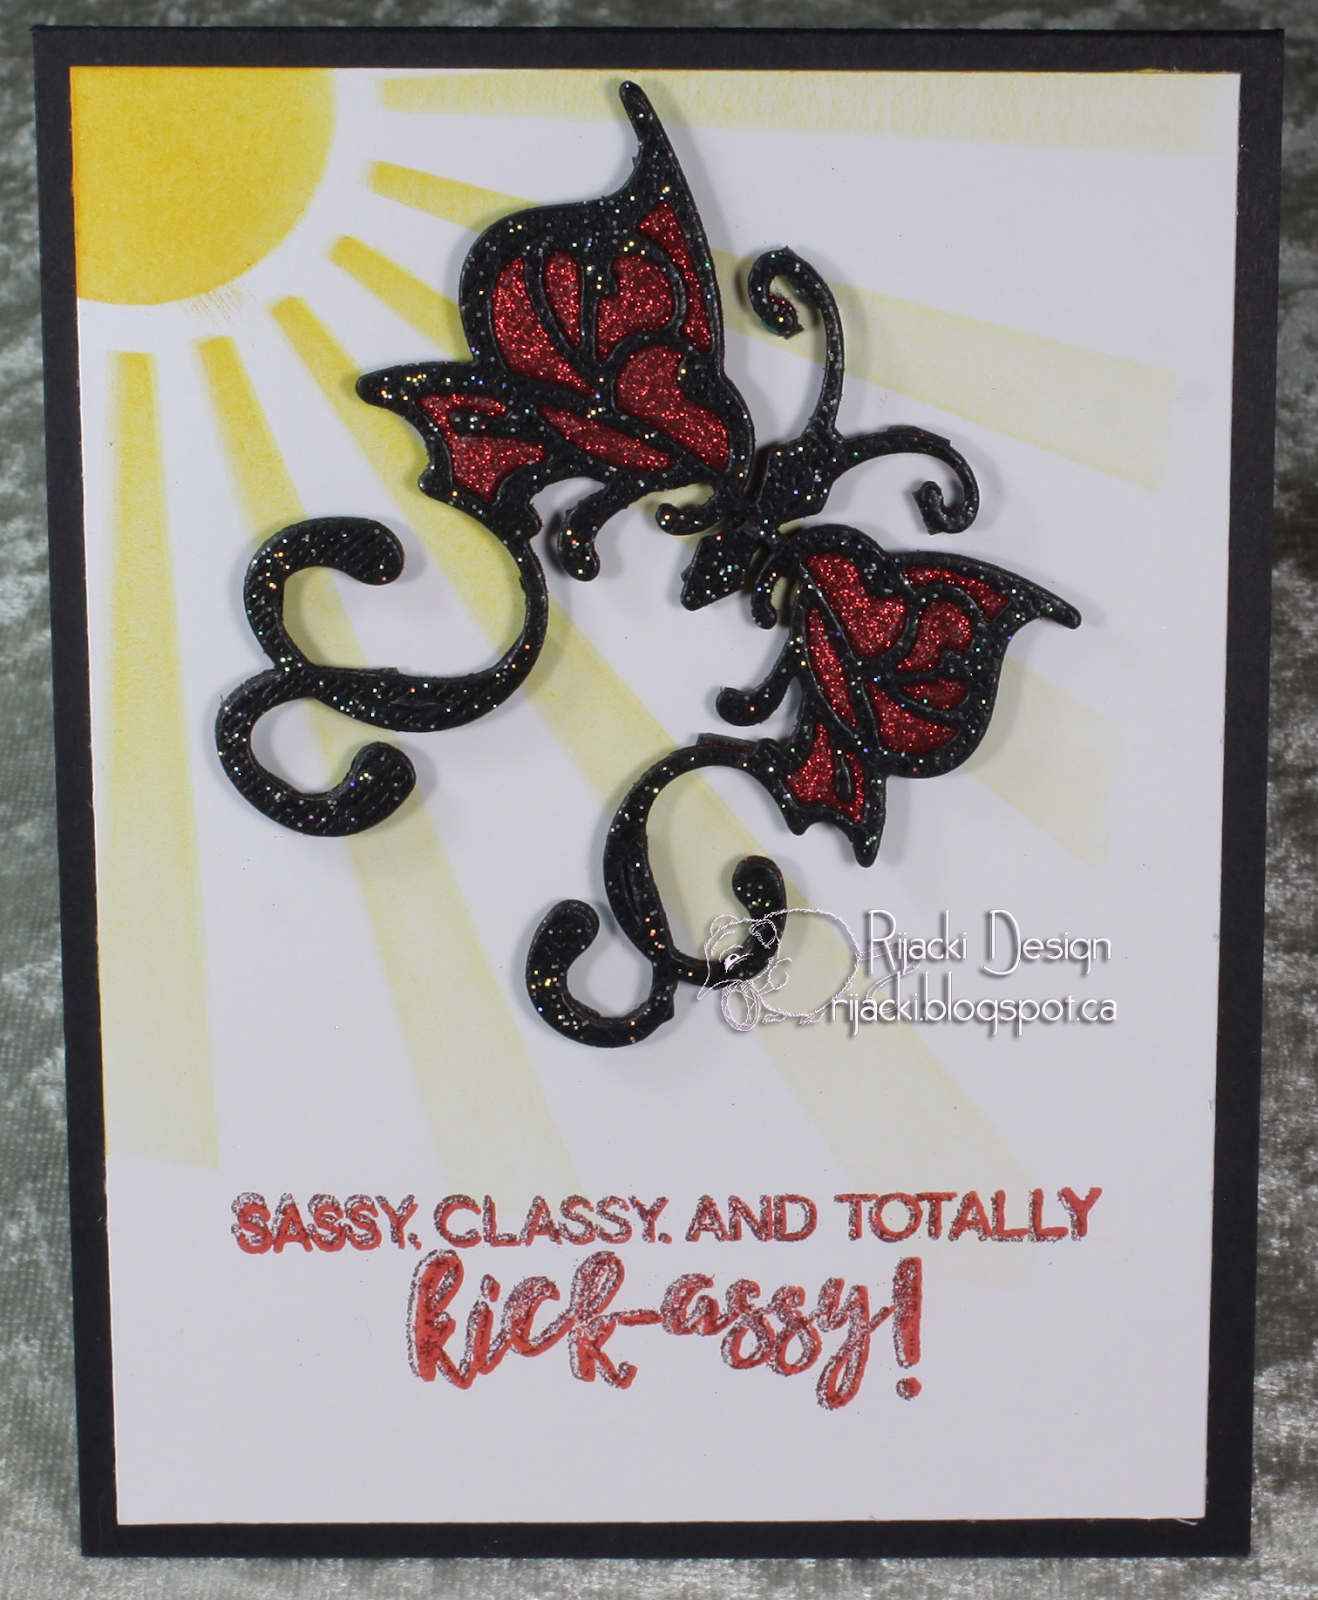
Like a sassy butterfly rising into the sky, classy and totally kick-assy! My card features a sentiment from Kraftin' Kimmie Stamps, a die cut from Spellbinders glittered with Silk Microfine glitter, and a stencil from My Favourite things coloured with Distress ink and Clarity brush.
Putting It Together
I was struggling to put an idea together to fit a challenge of glitter. Yes, glitter had me stumped. I fished about for a few ideas but nothing was biting. I thought about doing a glitter mosaic background to an image but nothing was perking my creative buds until I thought about the Rebel Butterfly my good friend, Betty gave me last year that I hadn't yet used. And an idea started building.

I used the die with black glittered cardstock and wanted to take a picture of it while formulating an idea to work with it. I had a stencilled panel on my desk that wasn't perfect for a previous project (Cat Nap) but was too good to just toss out. I plopped the die cut on it and... magic! I added the sentiment for a dry fit and oh so right.
To get the fad on the rays, I use Clarity brush with Distress ink, starting at the sun and brushing out down the ray lifting the brush as I sweep. I started with Mustard Seed and then added a lighter touch of Spiced Marmelade and Carved Pumpkin. I love stencilling and this is one of my favourite stencils.

To fill in the wings with a glitter mosiac, I put some adhesive sheet on heavy black cardstock and ran it through the Big Shot with the Rebel Butterfly die. The outside edges cut deeper than the inner parts of the wings, even when using a precision base plate.

Using my poker tool (toothpick), I carefully extracted the die cut without losing any of the bits.

I removed the release paper from all but the inner parts of the wings.

I carefully matched up the glitter stock die cut over the adhesive.

I carefully removed the release from the inner wing bits.

I then dumped Microfine glitter over the adhesive,

and brushed it off with a soft fluffy dollar store makeup brush.

I used my finger to buff the glitter and burnish it into the adhesive. The colour contrast and shine on the butterfly is amazing. This was an easy mosiac but looks astounding.

I dry fit again, adding a black matting that I would replace with a card base for the final.

I stamped the sentiment using the Essential Glue Pad and let it sit for a while to get tacky before adding the same red glitter I used on the butterfly. I should have let the glue get a bit more tacky before adding the glitter. After letting it dry a bit, I brushed off loose glitter and the effect was lighter than I wanted. So, I restamped over the glitter with Candied Apple Distress Oxides. I could also have stamped with red ink before stamping the glue to have a fuller red coverage. I wanted to use the glitter to have the perfect match to the butterfly.

When using a dark card base, I like to add a white or light coloured panel inside. I wanted a panel with partial circles cut from the corners but don't have a die like that, so I used a circle punch to snip off the rounds. It worked best putting the corner half-way in the circle. My first cut (shown) was a bit too deep.

After cutting the corners, I brushed on a little Candied Apple Distress Oxide with a Clarity brush.

I used Ranger's black adhesive foam on the back of the butterfly to give it dimension. The release paper on that foam is a lot more difficult to get off small snips, or even large ones, than the 3M foam mounting tape, but being black, it hides better behind the black of my butterfly.

All put together, I love it.

Inside, I used a quote from a long retired Kraftin' Kimmie Stamps set, a sassy quote from Mae West.


Supplies
Challenges
Kraftin' Kimmie Stamps Saturday: Glitter
Kraftin' Kimmie Stamps Make It: Feb/Mar set
Creative With Stamps: CAS + Sentiment
Incy Wincy: Nature and All of its Beauty
AAA Cards: Favourite Technique (stencilling and glitter mosiac)
Simon Says Stamp Wednesday: Anything Goes
Crafty Gals Corner: Anything Goes


Creative With Stamps: CAS + Sentiment
Incy Wincy: Nature and All of its Beauty
AAA Cards: Favourite Technique (stencilling and glitter mosiac)
Simon Says Stamp Wednesday: Anything Goes
Crafty Gals Corner: Anything Goes


Gorgeous glitter butterfly, so very unusual. Thanks for playing along with the favourite technique challenge at AAA Cards.
ReplyDeleteWay to go on your step-by-step w/ photo description of your journey in creating this card. Glitter on sentiment can be very challenging. Thank you for sharing your creation with us @ Incy Wincy Designs Nature And All Of Its Beauty Challenge. Good luck!-Maria Giselle B.
ReplyDeleteGorgeous card! Thanks for the tutorial and I agree, glitter can be intimidating at times. Thanks for playing along with us at Creative with Stamps!
ReplyDeleteThat is one sassy, classy and totally kick assy card! Your photo description really helped to understand how you did it too! Thanks for sharing it at Creative with Stamps and we do hope to see more of your beautiful creations soon! Hugs, Gwendolyn
ReplyDeleteBold and sassy card! Love the glitter and stenciling. Thanks for sharing at AAA Cards challenges.
ReplyDeleteSuch a fabulous make! Thank you so much for playing along at CWS Challenge this month. Looking forward to seeing you again!
ReplyDeleteCrafty hugs, Mary (DT)