

Hello! A retro look shaker card for a birthday greeting, such fun! And it's full of stars!

This shaker card features die cuts and more die cuts and a little bit of embossing and stenciling, too. The die cuts are from My Favourite Things, Hero Arts, Tim Holtz, and Echo Park. The papers are from Core'dinations, Stampin' Up, Recollections, and Simply Defined. Stencil and Embossing folder from Stampin' Up and Distressed ink finish the list.
I actually wasn't really planning a retro look when I started the card but I am absolutely lovin' the vibe of the finished project. Read on to see how I put it together.
Supplies


These are not affiliate links just the products I use and where you can find them, too (if they're not retired).
I decided to see if I could combine a few very different challenges into one project and have a bit of fun with it, too.
First, a concept, Stars with the suggestion to use products from My Favorite Things. Thinking about MFT led me to the next in the list.

A colour palette: Teal, light coral, grey, and black. I don't have any MFT inks (yet) but was pretty sure I could find the colours in my stash. I also thought about the MFT items I have and one of the die sets in my stash led me to the next in the list.

A sketch: and I decided to go a bit literal with the sketch since I have the nesting rounded square stitched frame dies.
Then to add in a bit more challenge, Anything But Stamps. But, I forgot that's a CAS challenge where their idea of CAS is stripped down to almost nada, so decided not to enter this into that after all. But... another challenge is for a die cut sentiment focal, so.. that fits.
And... on to the project!

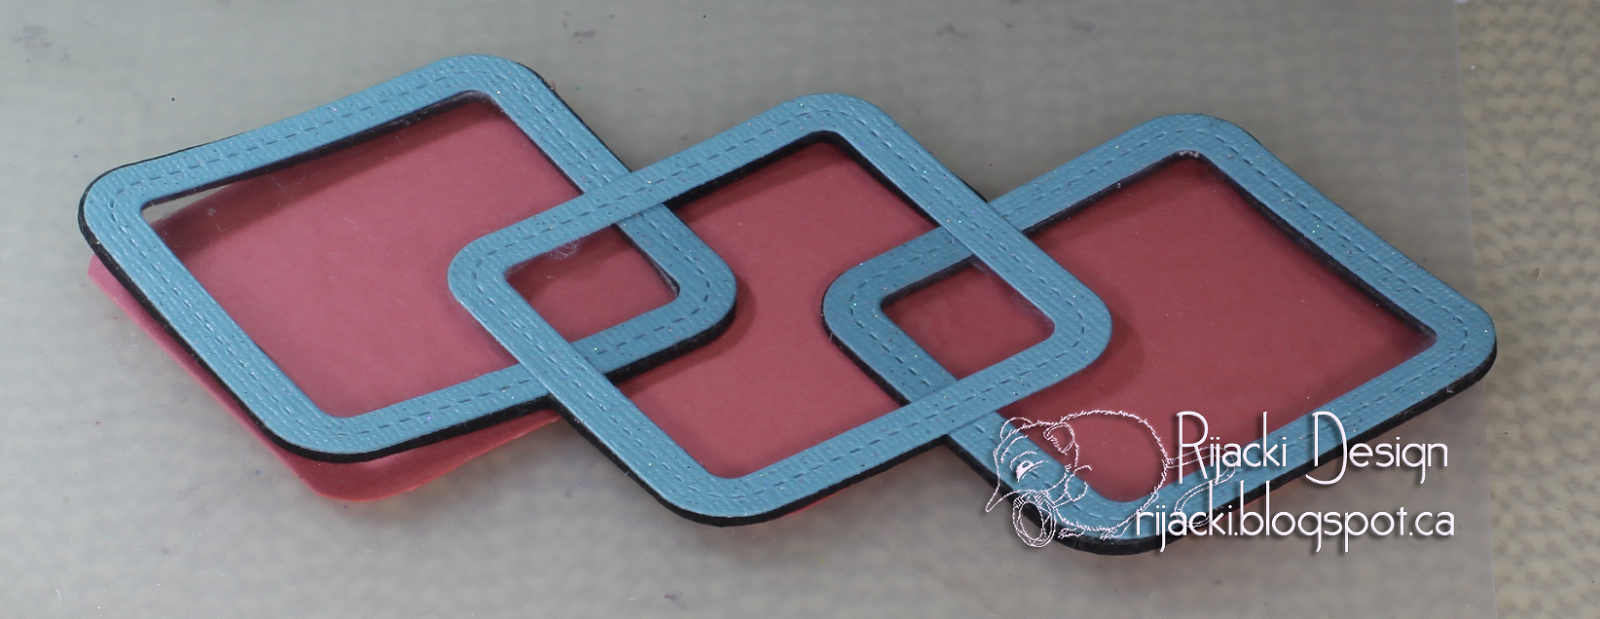
Initially I was going to use a Core'dinations Black Magic coral and black background but, as you'll see below, changed my mind while I was working on the project. So.. I used the second smallest of the nested rounded square frames to cut 3 sets of teal glittery frames and black fun foam frames (the fun foam is adhesive backed). I cut 3 squares of acetate (recycled packaging) to fit the frames. I cut a 5" square of the Black Magic cardstock and a 5 1/4" square of grey Value cardstock (from Micheals) as a matting. I hadn't decided what I was going to do for bows at this point.

I used a bit of Multi-Medium matte on the backs of the frames and adhered the acetate.

I ran the Black Magic panel through the Big Shot with the star embossing folder and sanded the embossing to reveal the 'hidden' colour, and.... wasn't really bowled over by the results. It looks more like flowers than stars. meh. I wasn't sure I wanted to use it at this point but was liking my windows so decided to continue building the shaker while I pondered that background. I thought that maybe it would grow on me.
Now, looking at the picture this morning, I am pondering how it would have looked if I debossed the stars... the stars would have been black on a mostly coral-orangey surface with a very distressed look... nah, not right for this project that way either.

I decided to be simple and have a centre square overlapping the two on the sides. For two of the frames, I lined up the foam frames and adhered them together, sandwiching the acetate between the card stock and the foam.

For the centre, I trimmed the foam to just cover the corners. I debated making the top square double high but decided on a lower profile card. Even though I was pretty sure I wasn't going to use the black and orange panel, I still used it for dry-fit placement since I was thinking of replacing it with a panel of the same size.

I adhered the corners and dry fit the squares upside down.

I used Multi-Medium matte on the middle frame where it overlapped the other two to make a single piece with the three frames.

I used my packet of solid scrap to hold the shaker frame down while the glue dried. I use Simon Says Stamp extra large storage packets for my stamps and discovered they can be quite handy for holding other stuff like paper scraps (the stuff that's too little to go in with the full size paper but too big to toss). I have packets like this for solid, watercolour, vellum, Christmas patterned, general patterned, foiled/glittered, background experiments, etc.

Once the glue dried, I had a single piece for the squares.

Looking through my stash for coral paper, I found retired Stampin' Up Cameo Coral (given to me by a demonstrator friend when they were trying to hook me on Stampin' Up *grin*). I considered at first making a 5" square panel when I got the bright idea of having it as a backer just for the shaker. I traced my shaker box trio...

... and cut it with scissors.

I had to adjust a couple times,trimming off small bits from this side and that, to make sure it was big enough to hold to the frames but not visible outside of the frames.
And then I dry fit it together and was pleased as punch! The hint of black from the foam is perfect. So retro, too!

Since I had a backer for the shakers now, I filled the wells with stars from Pretty Pink Posh.

I added a bead of glue to the frames. I got this 'glue pen' at the Dollar store and it's decent. I am, though, going to budget for a better glue pen.

After putting on the backing, I put it under the scrap paper packet again.

I decided to use the grey, the panel I had cut for a matting, as the backround. I ran it through with the embossing folder and then inked the edges with Black Soot Distress ink for a finished look.

For the sentiments, inside and out, I decided to use die cuts. I cut the outside sentiment, "hello" from just black glitter cardstock and the inside sentiment, "happy birthday" from black glitter and the coral. I ran them all through the Xyron and... ran out of the adhesive roll *sniffle* I need to get a refill and figure out how to replace the roll. I'm sure there are instructions on the package or Youtube. It took me about a year to go through that roll, so I'm not unpleased with it.

I also die cut black glitter bows. The bottom box and the "hello" nicely obscure the 'line' where I had to run the panel through the embossing folder a second time because the folder isn't wide enough (it's 4" x 5 1/4", not 5 1/4" square. If you look real close you can find the line but most of the munged stars are completely covered. Love the retro look of these colours together like this!

The reason I die cut "happy birthday" from both colours is to do a 'drop shadow' look. I'm glad I did the black from the glitter card stock 'cause it gives a real subtle bit of glitter to the edge. To line up the die cut words, I leave the 'back' one on the Xyron release sheet while placing the other on top. Then, too, they're a single piece to put on the card, much easier to handle.

For the inside, I decided to add some stars with stenciling. I used Hickory Smoke Distress ink and a Clarity brush for a softer look than the blender tool.

I adhered the front panel to the 5 1/2" square card base and then adhered the shaker container and sentiment. I added the die cut bows and finished them off with teal rhinestones.

Inside, I continued the colour scheme adding a teal rhinestone as the dot over the "i".


Challenges
Simon Says Stamp Wednesday: We're Seeing Stars
My Favorite Things Colour: Tropical Teal, Coral Crush, Gravel Gray, and Black Licorice
Feeling Sketchy: Sketch #173
Dies R Us: Sentiment as Focus
Emerald Creek dares: Fireworks and Sparks
Simon Says Stamp Work-It Wednesday: Bling
Through the Craftroom Door: Anything Goes
Happy Little Stampers with Dies: Anything Goes
Crafting From the Heart: Anything Goes
Creative Craft Cottage: Anything Goes
What a fun (and difficult-looking) design for a shaker, Rijacki! Love the stars inside and the little bows outside! Thanks for playing with us at the Simon Says Stamp Wednesday challenge!
ReplyDeleteOh what fun! Thanks for all the marvelous details! Sure to bring a smile! Thanks so much for playing in our ‘Die Cut Sentiment as Focus’ challenge at Dies R Us! Please come back again soon!
ReplyDeleteDarlene (DRU Blog Leader)
DIES R US CHALLENGE BLOG
DAR’S CRAFTY CREATIONS Please come for a visit.
great card! and i thik it would work for a male birthday card. lovely tutorial. thank you for sharing it with us at TTCRD and good luck, Theresa DT xx
ReplyDeletevery cool, I love the retro look you achieved
ReplyDeletethanks for joining us at HLS
Barb Housner (DT)
WoW, you made such a beautiful shaker card. I like the way have you used our sketch :-))
ReplyDeleteThanks for playing with us at Feeling Sketchy. Hugs, Andreja
Lovely work. Thank you for joining the challenge at Feeling Sketchy. Hope to see you again next time.
ReplyDelete