

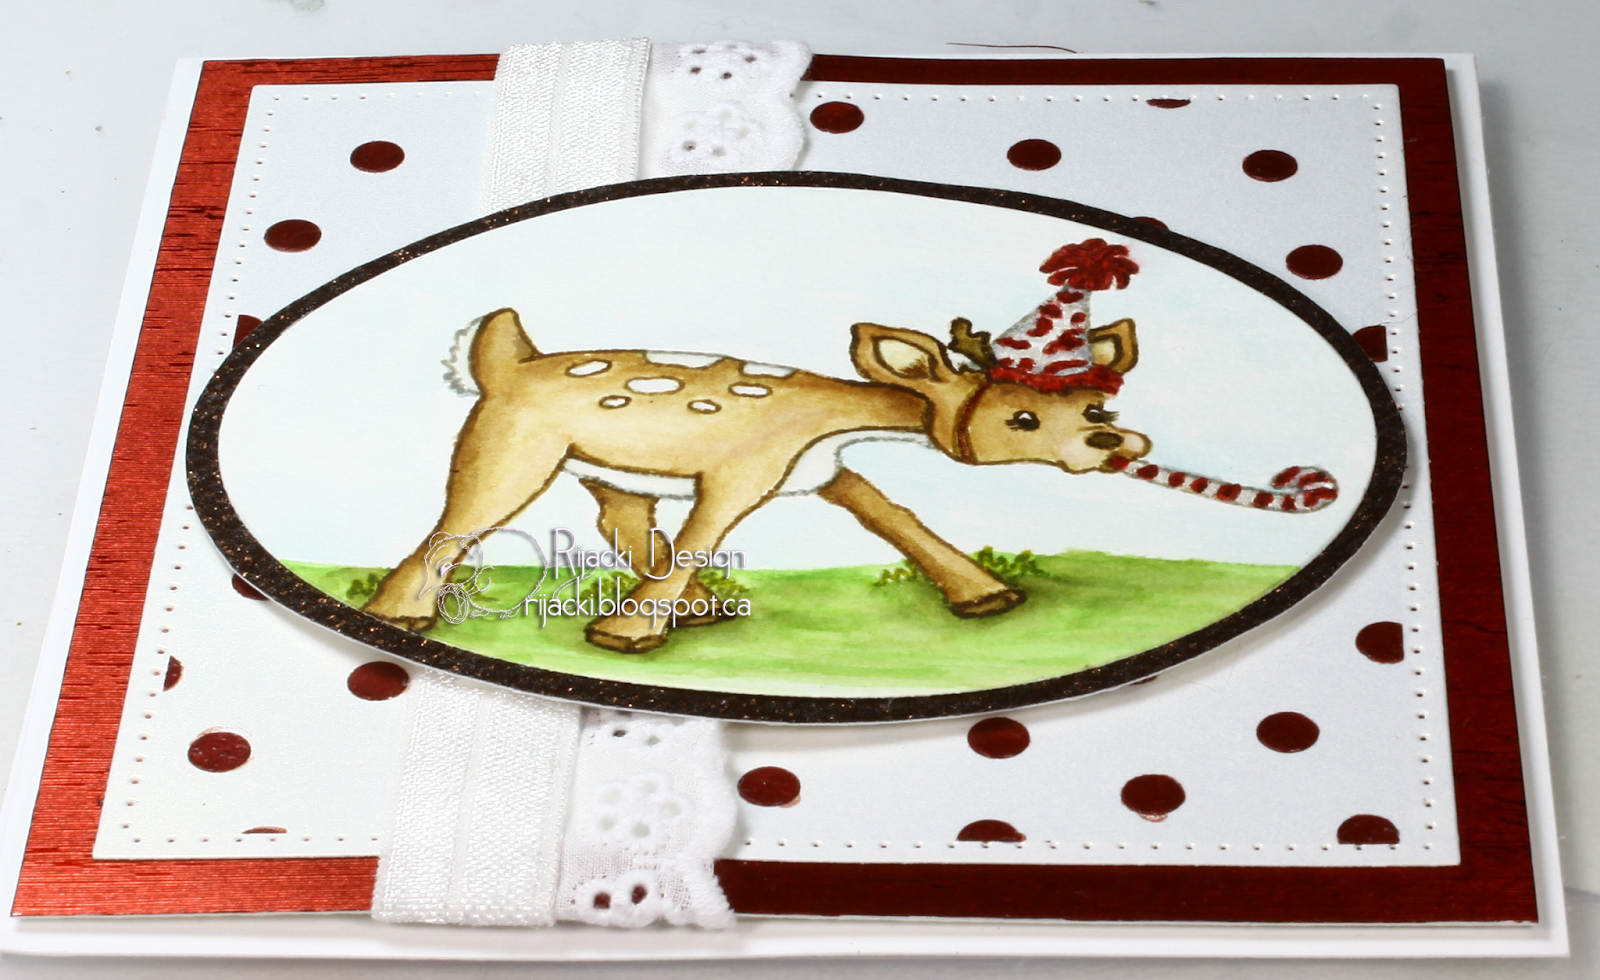
Today is Canada Day and Kraftin' Kimmie is hosting a Krafty Krop. The first challege is a birthday card, in honor of Canada's birthday, so I decided to use Dorothy and the colours of the Canadian flag, red and white.

Supplies


These are not affiliate links just the products I use and where you can find them, too.
Putting It Together
Since I made this as part of an online crop, I decided to go into more detail about the creation process. That does mean, though, that this post is going to be a bit picture heavy.
For the colouring on this project, I used Distress ink with waterbrush. I smush the minis on to a plastic sheet and use them from there. I also used some Perfect Pearls for accents. For this project, I'm trying out Artist's Loft student watercolour paper. Student paper is lighter weight, usually 90lbs, than the more common 140lb. I often use the lighter weight watercolour paper for stamped images because the student paper is smoother. The bumpiness (or tooth) of the heavier papers can make it difficult to get a crisp stamping, and the student paper has the same type of sizing so can handle a decent amount of water. The Artist's Loft (Micheal's brand) paper compared to the similar Strathmore 200 and Canson Value, both 90lb student watercolour paper: Artist's Loft is a bit more water sensitive but other wise decent and a few dollars less.

I stamped the image with a light brown to do a 'no lines' colouring. The 'no lines' technique does still use stamped lines, it just hides them in the painting or colouring vs having black lines of the stamping showing.

I coloured the deer with Antique Linen as a base colour and added shadowing and defining lines with Vintage Photo.

I used Tea Dye to colour the deer, adding more or less to shade or highlight.

I used Vintage Photo and Ground Espresso to deepen the shadows and contouring. I added shadowing to the white areas with Weathered Wood.

I started the grass with a wash of Mowed Lawn.

I added swipes of Peeled Paint...

...and blended to give the grass more depth of colour.

I used Crushed Olive to add the grass detail from the stamp.

I used Forest Moss to add shadowing in the grass.

When I started to paint the hat and noise maker, I realised I missed the inside of the ears. I used Antique Linen with shadowing and fur lines with Vintage Photo. For the hat and noise maker, I used Worn Lipstick, Candied Apple, Mahogany and Weathered Wood. I touched up the eyes with Black Soot.

I then added Perfect Pearls, Confetti White and Forever Red, for some sparkle and to finish the painting.

I added some Tumbled glass to the sky and I dry fit an oval die over the image to find the right size.

I decided to use the July sketch for KKS turned on its side.

I trimmed the image with the oval die.

I dry fit the oval in a dotted square with a stencil.

I die cut a white gold metallic panel and then used washi tape to secure it to my work surface. I also used the washi to mask off the dot lines.

I used more washi to secure the stencil over the panel. The stencil has a "happy" in the middle that will be covered by the oval.

To match the colours in the hat and noise maker, I added Forever Red to transparent gloss texture paste. Using texture paste with the stencil will also add a little texture.

I mixed the Perfect Pearls and texture paste using the palette knife on parchment paper.

I spread the mixed paste over the stencil.

The stencil all filled in.

I removed the stencil...

... and then the washi. I immediately took the stencil and palette knife to the bathroom to wash it off.

I used the heat tool to dry the texture paste and then dry fit the oval and squeeeeed for the cuteness.

I looked in my stash for matting and chose this dark red wood-grain foiled paper.

I trimmed the red panel and I looked though my stash of ribbons and decided to use a couple I had gotten as free samples several months ago. I dry fit the pieces.

To save some of the lovely red paper for another day, I cut out the middle which would be hidden by the stenciled panel.

When the red is adhered to the white, none can see the middle is missing.

I adhered the ribbon and lace together so I could use them as a single piece.

I anchored them on the back of the panel with washi tape.

I decided I wanted matting for the oval. Since I wanted a narrow mat, I traced the die I used to cut the deer. I traced it on the back since the panel (shown in a couple pictures down) is dark and not pencil friendly.

After tracing, I fussy cut the oval.

I added the oval to the brown glittered matting.

I dry fit the oval one last time before starting to assemble the card.

Inside the card, I decided to add a dotted detail. I used a dot border stamp, VersaMark, and Forever Red for sparkle. After stamping with VersaMark, I brushed on the Perfect Pearls and brushed off the excess with a clean soft brush. To set the Perfect Pearls, I sprayed a water mist in the air and waved the card through it.

I like using foam mounting tape, but it's not cheap, so I cut it into half or thirds before using it.

Because of the bulk of the ribbon/lace, I used foam mounting tape on the lowest panel. I added the tape around the edges and one piece in the centre to prevent it being crushed down.

I also added foam mounting tape to the back of the oval.
I built the layers of the card and finished the project.

Inside, too, I used a sentiment from a more recent KKS set. (A set that's stinkin' cute on its own.)


Challenges
Kraftin' Kimmie Stamps Canada Day Krafty Krop: Challenge #1 - Birthday
Simon Says Stamp Monday: Stencil It
Incy Wincy: Sparkle and Shine
Creative Craft Cottage: No Patterned Paper
Creative with Stamps: Celebrate
Seize the Birthday: Anything Goes
Kraftin' Kimmie Wonderful Wednesday: Anything Goes
Simon Says Stamp Wednesday: Anything Goes
Inspiration Destination: Anything Goes

Cute and sweet, Rijacki! Love how you chose to focus on Canada Day with your colors and image! I’m so glad you shared your wonderful project with us at Simon Says Stamp Monday challenge! hugs, Maura
ReplyDeleteThis is so cute! Love that image!! Thanks for joining our ‘sparkle or shine” challenge over at Incy Wincy Designs Challenge Blog!
ReplyDeleteHugs,
Karen C
This is so much fun and really made me smile, great tip about the perfect pearls.
ReplyDeleteThank you for joining us at Simon Says Stamp Wednesday Challenge x
Sweet fun creative card. I love the stencil paste coloring. The image is darling and beautifully colored. so glad you shared your card at Creative with Stamps for our Celebrate challenge.
ReplyDeleteBillie A
Creative with Stamps
Inspiration Destination
Catch the bug
Aud Sentiments
Paper Play Sketches
Wow there is a lot of work in this card. The design is so sweet.
ReplyDeleteThank you for joining creativewithstamps