Thinking of you as a fairy in a teacup. The inspiration for this was a "girly" challenge, a masking challenge, and a personal challenge to use at least one button and a doily. I am rather pleased with how it turned out.
Supplies
Stamps:Kraftin' Kimmie Stamps - Teacup Fairy: http://goo.gl/O9L2JJ
Hero Arts - Everyday Sayings: https://goo.gl/1lV8B2
Colouring and Ink:
Chameleon pens: http://www.chameleonpens.com/
Tim Holtz Distress ink mini bundle #1, #2, #3: http://goo.gl/zSS2re
Ranger Perfect Pearls confetti white: https://goo.gl/nriwy9
Tim Holtz mini ink blending tool: http://goo.gl/q3pDhM
Ribbon: Clipperstreet, local scrapbooking shop
Adhesive:
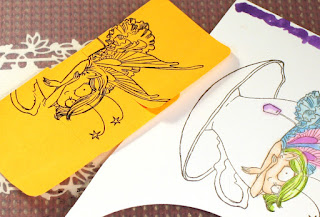
First thing I needed to do was to make a mask. I overlapped three full adhesive Post-Its.
Ranger mini misters: https://goo.gl/Mua2Mu
Recollections embossing powder, gold detail and sapphire: Michaels
Paper:
Heidi Swapp - Wanderlust paper pad: https://goo.gl/p9WGTS
Embellishments:
Rijacki Design - resin Button: made by me
Spellbinders - lace doily: Makersmart kitRibbon: Clipperstreet, local scrapbooking shop
Adhesive:
Tombow adhesive: http://goo.gl/XMLQG6
Scotch double-sided foam tape: https://goo.gl/cgYD4W
Ranger Multi-media Matte: http://goo.gl/Twfcs3
Putting It Together
One of the challenges used as inspiration for this piece is to use masking. I coloured the top of the Teacup Fairy, the fairy, with Chameleon pens and decided to mask her and use Distress Ink to colour the cup.First thing I needed to do was to make a mask. I overlapped three full adhesive Post-Its.
I fussy cut the mask. I only needed to cut the area where the cup meets the fairy or the tea tag, the rest I could just leave or cut away if if covered the cup.
I applied the mask to the fairy. It doesn't matter that the overlap wasn't in the right order, the mask won't be there in the end.
I started with antique linen Distress Ink to give an all over colour base.
I started with antique linen Distress Ink to give an all over colour base.
I wanted a bit more of a purple look, so I added seedless preserves. I splotched in the middle :( I'm still working on the 'always start off the paper' technique. Training yourself for techniques can be tough at times. The cup did end up a lot darker than I wanted after the ink dried
Because the blending and in made the stamp lines fainter, I used the Chameleon detail pen to re-ink the lines.
I removed the masking and fussy cut the whole image.
I added sapphire embossing to her antennas, earring, and the flounces of her dress. I also added Wink of Stella to her wings. I also spritzed the cup with Perfect Pearls confetti white in water.
At the top of the cup, there were spots the Distress Ink would not cover, places the alcohol of the pens had bled over. These bugged me while I worked on a different project and pondered them. Hmm.. thinks I, some china cups are rimmed with gold, that could work here. So I embossed the rim of the cup and saucer with gold embossing. I also added some white gel pend to the tea tag.
To make this into a card, I used a floral print from the Wanderlust pad, matted with a light blue. I threaded the button with ribbon, finally the purple I wanted to bring into the piece, and backed the cup with the lace doily. The sentiment, from Hero Arts Everyday Sayings, is in the same gold embossing as the rim on the cup and saucer.
It's not easy to see in the pictures, but the button has a purple sheen when tilted in the light. The fairy's hair is actually a pale green.
If I were to do this again, I would make the cup a lot lighter.
Challenges
Simon Says Stamp blog 20 April Wednesday Challenge - Make it Girlie
Facebook Group - Stamp, Share, and Inspire


hello! so awesoem, thanks for sharing the "how to's"...looks amazing! I am so glad you played along with us at simon says stamp wednesday challenge!
ReplyDeleteblog-paperie blooms
ig-2klines
sparkle & shine, kindness *~*
Such a lovely card!! Thanks for joining our challenge this week with Kraftin Kimmie Stamps.
ReplyDeleteMarilyn DT