

My card today is a lovely fairy bestowing her magic. The card features a Kraftin' Kimmie stamp and lots of polka dots!
Putting It Together
Starting this card, I had three things in mind: a sketch, a polka dot challenge, and wanting to use the cute fairy from the Magical Friends stamp set (available now in a kit with a new Krafty Kolours ink or alone after the May release). I also wanted to use at least one of the items from the Surprise Kit I got to announce the new inks.

The sketch I used comes from the Kraftin' Kimmie challenges.

The sketch I used comes from the Kraftin' Kimmie challenges.

For the polka dots, I got some papers out of my stash.

I wanted to paper piece her dress so I stamped on the dotty paper and fussy cut out just the dress.
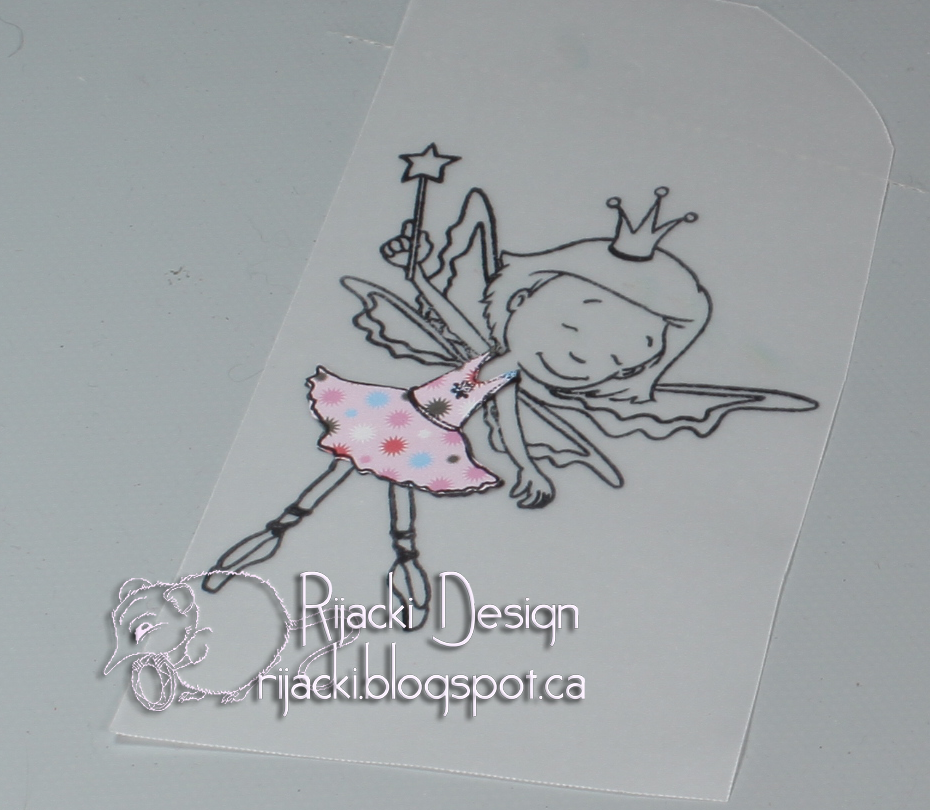
I stamped the fairy on vellum and dry fit the dress on her. I used vellum for the fairy because I wanted to have translucent wings and a delicate look to the fairy.

I used Prismacolour Pencils to colour the fairy and then used Wink of Stella on her wings. The Wink of Stella wasn't bold enough, so I brushed on Turquoise Perfect Pearls while it was wet and it worked to adhere the powder perfectly.

I fussy cut the fairy.

I adhered her dress with Zig glue pen to finish the fairy. The vellum achieved exactly the look I wanted. The Prismacolour pencils added opacity to the areas coloured but without weighing her down. Later I added touches of gel pen accents on her dress and crown.

I dry fit the fairy on the trimmed polka dotty papers. I changed to using the die from the surprise kit and cut it from glitter paper. I liked how it was coming together, even the acetate with dots for the panel behind here, but I wanted something to anchor the corners of the acetate.

I looked in Evernote, searching on 'corners' in my dies, and these swirl corners from a nested heart set popped out at me. I die cut them from a pink dotty paper, the same as the white panel (sadly both appear to be discontinued).

The advantage of the corners on the acetate, I had a convenient place to add the adhesive. I used foam mounting tape to pop the acetate panel up. After adhering the fairy to the front of the acetate with Zig glue pen, I also added a snip of the foam tape behind her dress to support the middle.

Since the "M" was going to be half-on and half-off the raised acetate, I added a snip of the foam tape to the side that would be off. The other side would be glued to the acetate.

I put the acetate in place and adhered the "agic" to the white panel. I like the two dimensions on the "Magic" with the "M" popped up. I also added two glittery enamel dots, one to dot the "i" and the other on the fairy's dress, and a glittery enamel star to her wand (from the December My Monthly Hero kit).

Inside, I used the swirls from the die cuts and added a sentiment using one of the Krafty Kolours. I like bringing the colours of the front to the inside. I was pleased how well the Mermaid Melody matched the glitter paper.


Supplies
Challenges
Kraftin' Kimmie Krafty Krop: Game #2 Sketchy
Kraftin' Kimmie Saturday: Polka Dots
Watercooler Wednesday: Feminine
Art Impressions: Things With Wings
Your Next Stamp: Colour Challenge #88
Try It On Tuesday: Die Cuts
Crafty Hazelnut's Patterned Paper: Anything Goes
Watercooler Wednesday: Feminine
Art Impressions: Things With Wings
Your Next Stamp: Colour Challenge #88
Try It On Tuesday: Die Cuts
Crafty Hazelnut's Patterned Paper: Anything Goes


What a sweet card! The image is adorable!
ReplyDeleteThank you for joining the Scrapping4fun.
Majda DT
Using vellum as the base for your cute little fairy was a great choice, Rijacki! It certainly did give your wings that special 'delicate, translucent' look, you were searching for! Your card is lovely with so many techniques used. Thanks so much for sharing your work with us at Watercooler Wednesday Challenge this week!
ReplyDeleteYour fairy does look magical floating on that acetate sheet. I love that you used Vellum to transfer her image into a such a delicate and fun gossamer imgage. The corner pieces are a great trick for hiding the glue dots. Perfect! Thanks so much for sharing on the "Feminine Anything Goes" challenge this week at Watercooler Wednesday.
ReplyDeleteWow Rijacki, it's not only the adorable little fairy which is working some magic. You've combined some great techniques to create this magical card. Love the colours, the paper-piecing, the delicate look of that vellum, to mention a few of the many things that work so well in this card. Love it! Thanks so much for joining our Watercooler Wednesday Challenge this week.
ReplyDeleteAn AMAZING project! Thank you for joining Try It On Tuesday!Hugs, Susi
ReplyDeleteA magical card, thank you for sharing with us at Try it on Tuesdays.
ReplyDeleteYvonne
thanks for sharing your magical card. Thanks for joining us at the Watercooler Wednesday Challenge!
ReplyDeleteI love this happy card! So pleased you joined us at Try It On Tuesday! Chrisx
ReplyDeleteSuper cute card
ReplyDeletethank you for your lovely entry at Scrapping4funChallenges
Rachelle DT
https://scrapping4funchallenges.blogspot.com
Superb card.
ReplyDeleteThank you for playing with us at Scrapping4fun challenges.
Priya-DT
What a sweet card! Love her paper-pieced dress! Thanks for playing along with YNS Challenge 88.
ReplyDeleteSuper cute, I like the repetition of the different types of dots throughout the card! Thanks for participating with CraftyHazelnut’s Patterned Paper challenge!
ReplyDelete~~Heidi @ My Little Stamping Blog