Flowers from a Magenta stencil and a Kraftin' Kimmie Stamps sentiment. Both are Canadian companies for an elegant card.
Supplies
Challenges
Creative Craft Cottage: Use Flowers
Kraftin' Kimmie Stamps Wonderful Wednesday: Anything Goes
Addicted to Stamps and More: Photo Inspiration (flower)
Art Impressions: Spring Fling
A Bit More Time to Craft: Anything Goes
Scrapper's Delights: Anything Goes
Inspiration Destination: Anything Goes
Kraftin' Kimmie Stamps Wonderful Wednesday: Anything Goes
Addicted to Stamps and More: Photo Inspiration (flower)
Art Impressions: Spring Fling
A Bit More Time to Craft: Anything Goes
Scrapper's Delights: Anything Goes
Inspiration Destination: Anything Goes
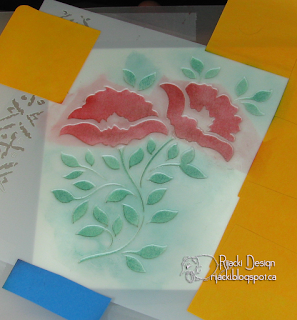
I love stencils. Magenta is a Canadian company that makes a wide variety of very lovely masks/stencils. Stencils can be used in many different ways. For this project, I used the stencil as the focal with texture paste as a resist to be able to add a light background without changing the vibrancy of the colours used for the main image.
Following a tip from Jennifer McGuire, I used Glad Press 'n' Seal on the back of my panel to stick it to my work surface so it wouldn't move around as I worked with it.
I used Post-It so anchor the stencil on my work surface and to cover any of the cardstock showing outside of the stencil area. I had turned the stencil for the image to fit on the panel where I wanted it instead of square to the panel.
I added more Post-Its to cover up the flower area so I could use greens on the leaves without risking getting the green on the flowers.
I used the blender tool to pounce on Cracked Pistachio over all and then Evergreen Bough intentionally less evenly.
I covered the green and then did the same for Worn Lipstick and Festive Berries on the flowers.
To add even more variation in the green, I used a stenciling brush on the leaves to add Pine Needles.
Done with this stage of the colours.
I used a putty knife to spread clear gloss Texture Paste over the stencil. The paste picked up some of the colour, more noticeably on the red.
I carefully removed the stencil and set the panel aside to dry. I immediately went to the washroom and rinsed off the stencil with warm water. Taking care of it immediately makes it easier to clean it up.
When the texture paste was dry, I used a Clarity brush to add a soft background of Broken China. The Texture paste acts as a resist, so the background doesn't change the colours of the image.
With the Clarity brush, I added some Festive Berries between and close around the flowers.
I wiped the texture paste protected areas, to remove any ink from the brush.
And... the stenciling was done. I used a Spellbinders matting die to cut it into a square with a matting edge.
I stamped the sentiment in Archival black ink and mounted the panel on a square card base. I left the inside blank for a personalised setting.


Beautiful card and love the tutorial . Thank you for joining us at Creative Craft Cottage challenge good luck Ginny DT for Creative Craft Cottage
ReplyDeleteMy Blog As I do Rodos
Beautiful card, thanks for sharing with Inspiration Destination. Wendy DT xx
ReplyDeleteAmazing work!! Thanks for joining us at Scrapper's Delights! Hugs, Mieke DT
ReplyDeleteSuch a pretty stencilled image, thanks for sharing at ATSM. :)
ReplyDeleteHoly smokes how gorgeous!!! Thanks so much for entering it in the Wonderful Wednesday challenge at Kraftin' Kimmie!
ReplyDeleteBeautiful. I love the pictorial instructions too.
ReplyDeletelovely card thanks for joining us at the Scrappers Delight challenge this month
ReplyDeleteJane DT x
Your card is very beautiful Creative Craft Cottage!
ReplyDeleteThank you for joining us at !
Hope to see you again.
hugs, Ŧĭƙĭ
≽ܫ≼