

A bit of love, a cute mousie offering a flower to an iridescent hummingbird. A card of love that could be a Valentine or even at any other time of the year.

Supplies


Putting It Together
Today I went to pick up packages and one of the packages was four lovely stamps from House Mouse Designs that were what I got from one of my wins for the House Mouse and Friends challenge blog! I was overjoyed the design team picked my card and thrilled when I could choose more cutie patootie House Mouse Designs stamps as the prize. In the same package run I also picked up the Simon Says Stamp Premium Dye inks that was a prize, from the same challenge blog, for another card of mine.

The stamps were a gift card and I was so happy I could get stamps on the overstock sale so I could stretch that gift card as far as possible :) So... my card today features one of the stamps from this bounty :) Rather fitting since is a "love" and "thinking of you" card *grin*

I stamped the image in a dark brown, Memento dye ink - Rich Cocoa, with the intent of doing a semi-"no lines" technique.

The House Mouse Designs stamps almost paint themselves some times, or at least the mousies do. I use a waterbrush and Distress Ink for my colouring. The mouse is Tea Dye, Walnut Stain, Rusty Hinge, and Ground Espresso.

I'm not entirely sure why I started at the bottom and worked up, but.. I did. I had an idea of how I wanted to paint the hummingbird, but for some reason the hummingbird was intimidating me.

I painted the start of the ground, still putting off the hummingbird.

I even worked on the background as I put off painting the hummingbird.
The card background is a stencil from Southern Ridge Trading Company, a Canadian company. I met the owner/artist for SRTC last year at a creativity expo near where I live. I had a lovely chat with her about her lovely laser cut chipboard embellishments. One in particular I would have loved in a stencil. Apparently I wasn't the only one thinking stencils, because now they're carrying stencils, many made from the same patterns as the chipboard pieces. Wahoo-coo-ka-choo!! I love stencils! I picked up a few 3"x3"(this being one of them) because I thought they might be handy for small spaces. I -love- them!! To do an all over of a larger area, like this, I did have to move the stencil around, but that's perfectly fine by me. I'm going to be getting some later stencils later, too.
I used a Clarity brush with Worn Lipstick and Fired Brick, same colours as in the flower, for a softer look. I didn't want the hearts to be Bam-Pow in your face, as they would have been with the blending tool, but still very present.

I dry fit the panels to see if I was on the right tack.. and continued to procrastinate starting on the hummingbird *laugh* I also thought how I could have stamped with the intent to do a single layer.

I painted the hummingbird with Perfect Pearls for an iridescent sheen. I looked up pictures of hummingbirds on Google to help with the colours.

To do a stenciled background on the image, I need a mask. I stamped vellum and...
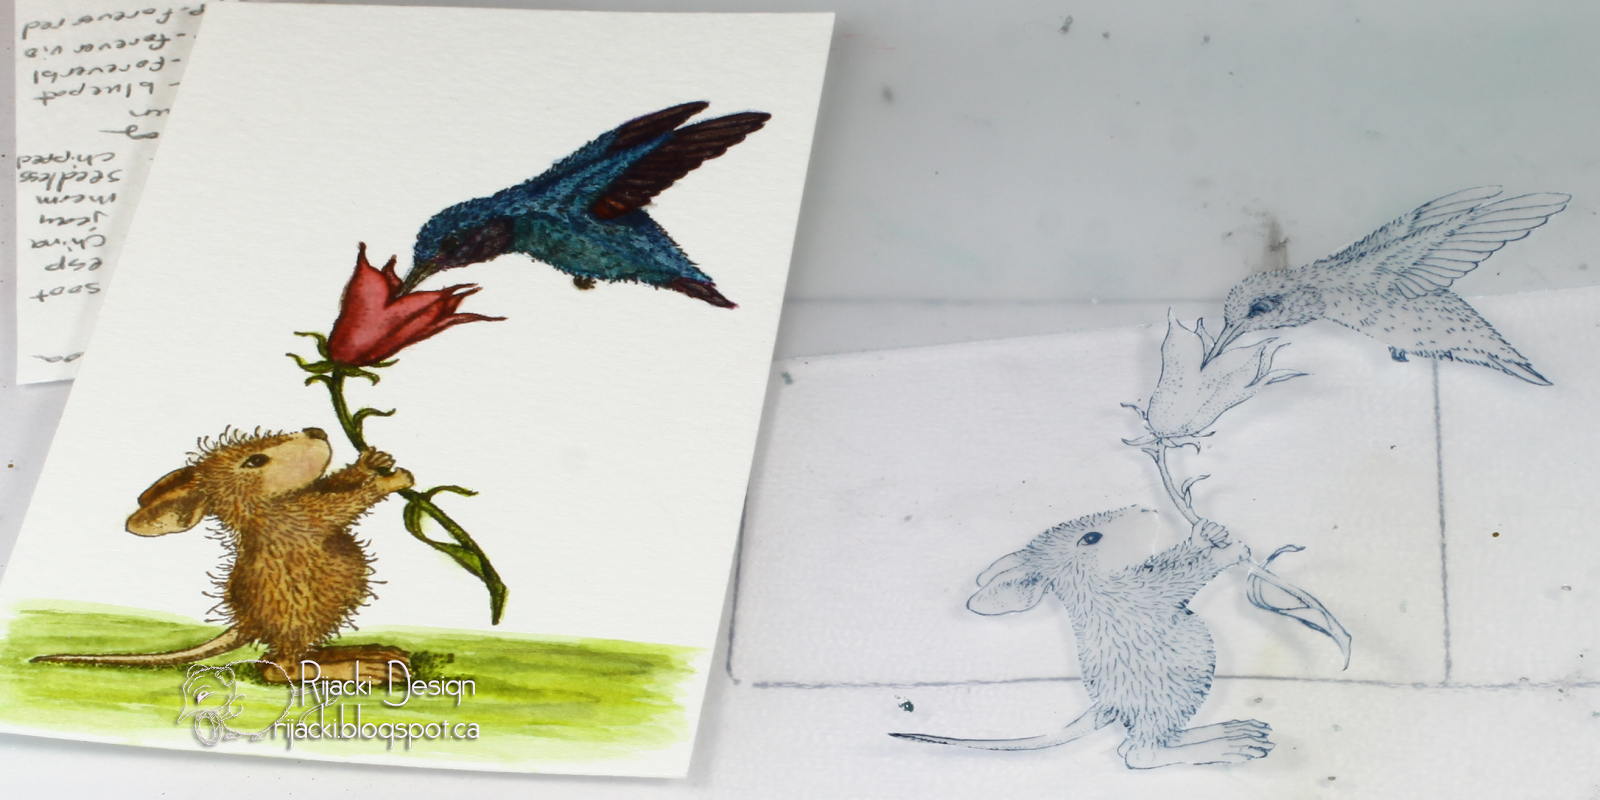
...Fussy cut the vellum.

I added repositional adhesive to the back of the vellum mask and positioned it over the mouse, flower, and bird. The vellum mask will be re-usable so I will store it with the stamp. I've started using vellum for my masks because they're more durable than printer paper (which works wonderfully, too) and easier to position because you can see through them. The vellum soften image is rather pretty, too.

I used an Elizabeth Craft Designs stencil to add a cloudy day background using the Clarity brush. I also added in some grass with the stencil, but didn't like the way that looked so I softened it with a wet waterbrush and added in slips of grass to give the ground more depth.

I trimmed the painted panel and dry fit the card adding in, red glitter card side matting, red cord with a bow, and a vertical sentiment from Impression Obsession.

I stamped the sentiment with VeraMagic chalk ink Midnight Black. I chose the chalk ink for a softer look than the crisp black archival ink. I added foam mounting tape to the image panel for some dimension.

For the inside, I used the same 3"x 3" heart stencil and scrap paper with a circle cut out (from a long ago project). I used the Clarity brush again with the same colours as the front. I stamped a sentiment from the Kraftin' Kimmie Stamp Love Story Sentiments in the centre of the circle using the same Midnight Black chalk ink.

I love the shimmeriness of the hummingbird. I turned out just the way I wanted.

Challenges
House Mouse and Friends: Give us a Bow
Creative With Stamps: Valentine
Pearly Sparkles: Love is All Around
Just For Fun Rubber Stamps: Sweet Nothings
More Mixed Media Challenge: Red
Crafty Friends: All That Glitters
Creative With Stamps: Valentine
Pearly Sparkles: Love is All Around
Just For Fun Rubber Stamps: Sweet Nothings
More Mixed Media Challenge: Red
Crafty Friends: All That Glitters
Through the Craftroom Door: Anything Goes
A Bit More Time to Craft: Anything Goes
Kraftin' Kimmie Stamps Wonderful Wednesday: Anything Goes
Penny's Paper-crafty: Anything Goes
Simon Says Stamp Wednesday challenge: Anything Goes
Crafty Gals Corner: Anything Goes
A Bit More Time to Craft: Anything Goes
Kraftin' Kimmie Stamps Wonderful Wednesday: Anything Goes
Penny's Paper-crafty: Anything Goes
Simon Says Stamp Wednesday challenge: Anything Goes
Crafty Gals Corner: Anything Goes

Very pretty card! The image is so sweet!
ReplyDeleteThank you for joining us at Creative With Stamps!
Lilian
The Leaf Studio
Your coloring is lovely but I especially love the stenciled hearts! I do like that you can use it for several occasions! Thanks for sharing with us at Just for Fun!
ReplyDeleteCute card
ReplyDeleteBeautiful card! Love your colouring and your hearts background. Thank you for playing along with us at Crafty Gals Corner.
ReplyDelete♥ Lena, DT
Lena’s Creations
Beautiful card. Thank you so much for entering our ATG challenge at TTCRD this week. Looking forward to see you again next challenge. Agnieszka DT
ReplyDeleteOh my GOSH..I love this card. Beautiful. Thanks for the tutorial. Great colors and so glad you shared over at Creative with Stamps.
ReplyDeleteBillie A
Creative with Stamps
Inspiration Destination
Catch the bug
Aud Sentiments
Stampavie and More
Very sweet card. Your coloring and background are lovely. Thank you for sharing with the Just For Fun February Monthly Challenge.
ReplyDeleteSo sweet and pretty, beautiful colouring and stenciling and also love the inside.
ReplyDeleteThank you for sharing with us at Simon Says Stamp Wednesday Challenge x
WOW, what a beautiful card. Love to see the steps you used to create it. Lovely color work and beautiful sentiment to go with the sweet mouse and bird friend. Thanks for sharing it with us at the House Mouse and Friends Monday Challenge.
ReplyDeleteHugs
Sue
Thank you for sharing your lovely crafting for Penny’s challenge 317 – hope to see you again soon – Hazel DT x
ReplyDeleteGorgeous card Rijacki and I am so happy that you received your fabulous prizes! You lucky girl :-) The whole design of this card is so beautiful! LOVE it :-)
ReplyDeleteThanks for joining us on the House Mouse and Friends Challenge 🐭
Luv
Lols x x x
Super adorable creation, stunning colouring darling image, great detailed post.. so pleased you made the most of your chall. wins enjoy..
ReplyDeleteThanks for sharing with us at House-Mouse & Friends Monday Challenge
Smiles Christine xx
Beautiful card with a super cute image. Love the sparkling around the image. Thanks for sharing your creation with us at Crafty Friends, we hope to see you back again.
ReplyDeleteIf you look at Creative with Stamps challenge maybe you will be happy...as you are the winner there...contact us please...
ReplyDeletehttp://creativewithstampschallenge.blogspot.de/2017/03/winners-from-february-challenge-11.html#comment-form