

A few weeks ago I was thrilled to find out my entry for a Paperbabe challenge had been the one randomly picked for the prize. I was even more thrilled when I got my envelope from the UK! I had been coveting this fox from the first time I saw him and now he was mine :) The sentiment is so perfect, because my heart was filled without trying by Kim of Paperbabe.
Challenges
Paperbabe: Anything Goes
Crazy For Challenges: Forest Fun
AAA Cards: Masking
More Mixed Media Challege: Brown
Simon Says Stamp Work It Wednesday: Red, Orange, Yellow, and/or Brown
Penny's Paper-crafty Challenge: Winter/Christmas
Crazy For Challenges: Forest Fun
AAA Cards: Masking
More Mixed Media Challege: Brown
Simon Says Stamp Work It Wednesday: Red, Orange, Yellow, and/or Brown
Penny's Paper-crafty Challenge: Winter/Christmas
Supplies


I decided to feature the gorgeous fox in a wintry scene using masking, a stencil, and the forest oval from the Hero Arts August kit.

When getting a brand new stamp, I will often stamp it off on to scrap to condition the stamp. Since this is a 3 piece layering stamp, I also wanted to get a feel for how the pieces fit together. While I was doing this, I was thinking about what I wanted to do as a layout and thought about the forest oval in the Hero Arts August kit. Some day I will actually use it with a fairy from the kit *laugh*

To make a mask for the image, I stamp on to typing paper. It doesn't matter the colour of ink, just that the shape is complete.

I fussy cut the mask.

Removable adhesive allows the mask to stick in place but be easily removed. The typing paper masks can usually be reused a few times.

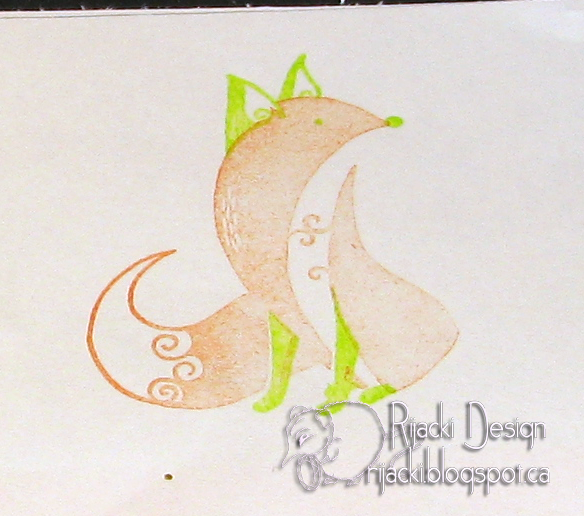
I stamped the 'real' image on watercolour card stock. The Misti is a great tool for layered stamps like this. I love the curlicues on the fox.
 I put the mask over the image. The advantage of using odd colours is that it's easy to see in the pictures which is the masked image.

I created a snow drift mask with the Fawn Lawn Stitched Hillsides and more typing paper with removable adhesive. The top part covers the lower sky while shading the snow with Weathered Wood. The bottom part covers the snow to make the rest of the background.

To add in forest behind the fox, I added the TCW birch tree stencil to the other two masks and taped it to my work surface.

With the blending tool, I added Faded Jeans as a night sky background.

Before removing the masks and stencil.

With the masks and stencil removed. I love the effects you can get with masking and stencils.

I dry fit the pieces. I decided to use a brown vintage dotted paper from Bo Bunny as the background. I cut the foreground trees from shimmer paper with a faint gold tint.

I used Stormy Sky marker and ink with blender to shade the foreground trees of the die cut. After adhering the fox panel to the foreground trees, I used a blender to add a Chipped Sapphire edging to give the oval a finished look.

I embossed the sentiment in antique gold on the same paper as the foreground trees and then fussy cut around it.


I am quite pleased with this fox.

When getting a brand new stamp, I will often stamp it off on to scrap to condition the stamp. Since this is a 3 piece layering stamp, I also wanted to get a feel for how the pieces fit together. While I was doing this, I was thinking about what I wanted to do as a layout and thought about the forest oval in the Hero Arts August kit. Some day I will actually use it with a fairy from the kit *laugh*
To make a mask for the image, I stamp on to typing paper. It doesn't matter the colour of ink, just that the shape is complete.

I fussy cut the mask.

Removable adhesive allows the mask to stick in place but be easily removed. The typing paper masks can usually be reused a few times.

I stamped the 'real' image on watercolour card stock. The Misti is a great tool for layered stamps like this. I love the curlicues on the fox.


I created a snow drift mask with the Fawn Lawn Stitched Hillsides and more typing paper with removable adhesive. The top part covers the lower sky while shading the snow with Weathered Wood. The bottom part covers the snow to make the rest of the background.

To add in forest behind the fox, I added the TCW birch tree stencil to the other two masks and taped it to my work surface.

With the blending tool, I added Faded Jeans as a night sky background.

Before removing the masks and stencil.

With the masks and stencil removed. I love the effects you can get with masking and stencils.

I dry fit the pieces. I decided to use a brown vintage dotted paper from Bo Bunny as the background. I cut the foreground trees from shimmer paper with a faint gold tint.

I used Stormy Sky marker and ink with blender to shade the foreground trees of the die cut. After adhering the fox panel to the foreground trees, I used a blender to add a Chipped Sapphire edging to give the oval a finished look.

I embossed the sentiment in antique gold on the same paper as the foreground trees and then fussy cut around it.


I am quite pleased with this fox.
Thank you for sharing your lovely crafting for Penny’s challenge 297 – hope to see you again soon – Hazel DT x
ReplyDeleteLove your wolf image, and you did a great job with masking on this very creative card. Thanks for linking up and playing along with our Masking challenge at AAA Cards.
ReplyDeleteLovely work. Thank you for joining the challenge at More Mixed Media. Hope to see you again next time.
ReplyDeleteRijacki, this is an amazing work with stencils and masks! Thank you so much for sharing with us at AAA Cards Challenge. - Sweet Kobylkin
ReplyDelete