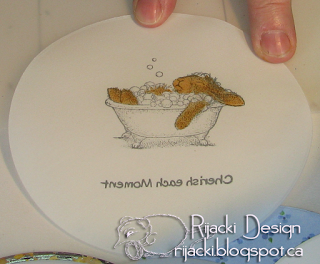
Bubble baths are divine, especially when it is cold and rainy outside. When you're deep into the bliss of a bubble bath, it feels as if the whole world is part of one great big bubble, or maybe just your bathroom. This bunny in the bath tub has entered that nirvana moment.
This shaped easel card is partially vellum and translucent paper to give the bath's background a bubble look.
Challenges
House Mouse: Shaped Card
Tuesday Throwdown: Add a Border
Crazy Hazelnut's Pattern Paper Challenge: Patterned Paper
Addicted to Stamps and More: Make Your Mark
Crafty Gals Corner: Anything Goes
Inspiration Destination: Anything Goes
Penny's Paper-crafty: Anything Goes
Simon Says Stamp Wednesday challege: Anything Goes
Through the Craftroom Door: Anything Goes
Supplies
Putting It Together
One of my favourite card folds is the easel because it stands up on its own. For this project I wanted to have a bubble, a round card. Round cards don't stand up too easily, so an easel card makes it easier for the recipient to display it.
When making a shaped easel, you can start with a square or rectangle similar in size to the shape you want to die cut. For an easel card, scoring the base is pretty easy. Add an additional score at the half-way point on you front panel, This will provide the base for the stand up.
When making a shaped card, the easiest way to do it is die cut for the shape with the top part of the die off the fold of the card. Since this is going to be an easel card, the complete circle can be in the front panel with the card base not quite a full circle.
And the easel base is done. The front panel will attach to the front part of the fold.
I die cut a full circle from heavy vellum and the translucent shimmery vellum-like Media Mixage. I die cut a partial circle from white value cardstock and the blue flower paper (which I think makes a pretty bathroom floor for the rabbit). I used the same circle die and one smaller to cut a silvery ring to hide adhesive with a design detail. Working with transparent or translucent, you have to think about how the adhesive will show through. I dry fit it all together with the stamp.
I used black dye ink to stamp directly on to the translucent circle and then embossed with pearl. Since the paper is see-through, I did the painting from the back side.
I kept the colouring simple, using only 6 colours of Distress Ink in the watercolouring.
I adhered the half circle of patterned paper to the value paper and adhered both to the full circle of heavy vellum. I added a thin line of adhesive to the outside of the circle and matched up the circles to adhere them together.
The translucent paper gives everything an ethereal, bubble look.
I added the silver ring to hide the thin line of adhesive and finish off the front.
The bottom of the full circle panel gets attached to the forward bend of the card base. I added a small portion of a circle in the blue paper on to a slightly larger silver one. The back part of the silver is not adhered to the base but is bent up slightly to act as a stand up helper for the easel.
I stamped another sentiment into the inside of the card.


So soft and relaxing, makes me want to get in the tub myself. So glad to have found you through Simon Says Stamp's challenge.
ReplyDeleteOh he is so cute ! Love the vellum.
ReplyDeleteThank you for joining us at Simon Says Stamp this week X
Love the way you have created your beautiful card Rijacki, and thank you for the 'How To'. Glad you joined us at House Mouse & Friends Monday Challenge. Hope to see you again,
ReplyDeleteDorte x
A lovely image and you have made such a beautiful card with it. Thank you for sharing it with us at Penny's Paper Crafty Challenge.
ReplyDeleteAnne DT
Love this sweet image, and your circle easel card! Pretty papers and colors as well. Thanks for sharing with us at the House Mouse and Friends Monday Challenge.
ReplyDeleteHugs
Sue
This is adorable! Love how you created your easel card. Thanks for joining us at Tuesday Throwdown.
ReplyDeleteA lovely card with a gorgeous image. Thank you for sharing at Crafty Hazelnut's Patterned Paper. Rebecca x
ReplyDeleteThanks for the tutorial! Thank you so much for entering our ATG challenge at Through The Craft Room Door this week. Looking forward to seeing you again next challenge.
ReplyDeleteCrafty hugs,
Ema