

A jolly elf in a red suit with his furry friend, Ho Ho Ho, this card features stamp sets by Kraftin' Kimmie Stamps, Distress ink watercolouring, a stencil from Simon Says Stamp glittered with silk microfine glitter from Elizabeth Craft Designs, a cabin in the North Pole, and an embossed sentiment! Tis the season to be Jolly! Fa-la-la!

Putting It Together
Glitter with a stencil is a fun technique that I wanted to pair with the adorable Santa. The stencil is a little bit big for an A2 card (5 1/2" x 4 1/4") so I went with a square to fit in all the goodness.

I used Distress ink with a waterbrush to colour the Santa and his friend. I used Gelly Roll for metallic touches on the buckles and buttons and Nuvo Crystal drops to add dimension and shine on the candy cane and puppy nose. I gave Santa a wintergreen candy cane for a little colour other than red red red.
And now on to the glittering...
I added a sheet of adhesive to cardstock.

To keep the stencil from sticking on the adhesive, I liberally stamped it with the Versamark pad. Something about the stickiness of the Versamark keeps it from sticking on adhesive.

I then put the stencil, Versamarked side down, on the cardstock with the adhesive sheet. I used the release sheet from the adhesive to make sure it was firmly adhered on all sides. You don't want the glitter to sneak under the stencil.

I dumped the True Red silk microfine glitter over the stencil and the exposed adhesive. I used a coffee filter to contain the glitter. To further help contain the glitter mess, use a Swiffer sheet under everything (which I didn't do here).

With the stencil still in place, I used a soft dollar store makeup brush to wipe away excess.

Still with the stencil in place, I used my fingers to burnish the red glitter into the adhesive. If you feel any stickiness, you can repeat the dump, brush, and burnish to make sure the surface is covered.
Then, after carefully removing the stencil I repeated the dump, brush, and burnish with Cool Diamond for a white sparkly background.

I trimmed the edges of the stenciled panel.

I dry fit the Santa with the Ho Ho Ho and was gleeful.

I dry fit some papers together with the Ho Ho Ho.

I fussy cut the Santa with a narrow margin and used a corner punch on the swiss dotted background and dry fit them all together again.

I added foam mounting tape to the back of Santa, doubling it up on one side (not shown) so I could also use foam tape on the stenciled panel and have Santa on both surface heights, raised above them.

I added a bow of white with red stitching and red and green metallic thread. To make the thread loops, I use mini Glue Dots and just criss cross over a dot until it's not sticky then add another and then use a mini Glue Dot to stick them to the bow with them all sticking to the card with the other side of the first dot. Easy Peasy.

Inside I stamped and embossed a sentiment from the Shake It Up set and added some snow and and a candy cane. I also stamped the cabin and pole from the new Reindeer Games set and added a bit of colour. I love the Emerald Creek embossing powder Yuletide. It's a mix of red and green glitter with a base of green to hold it together. Perfect for this sentiment.

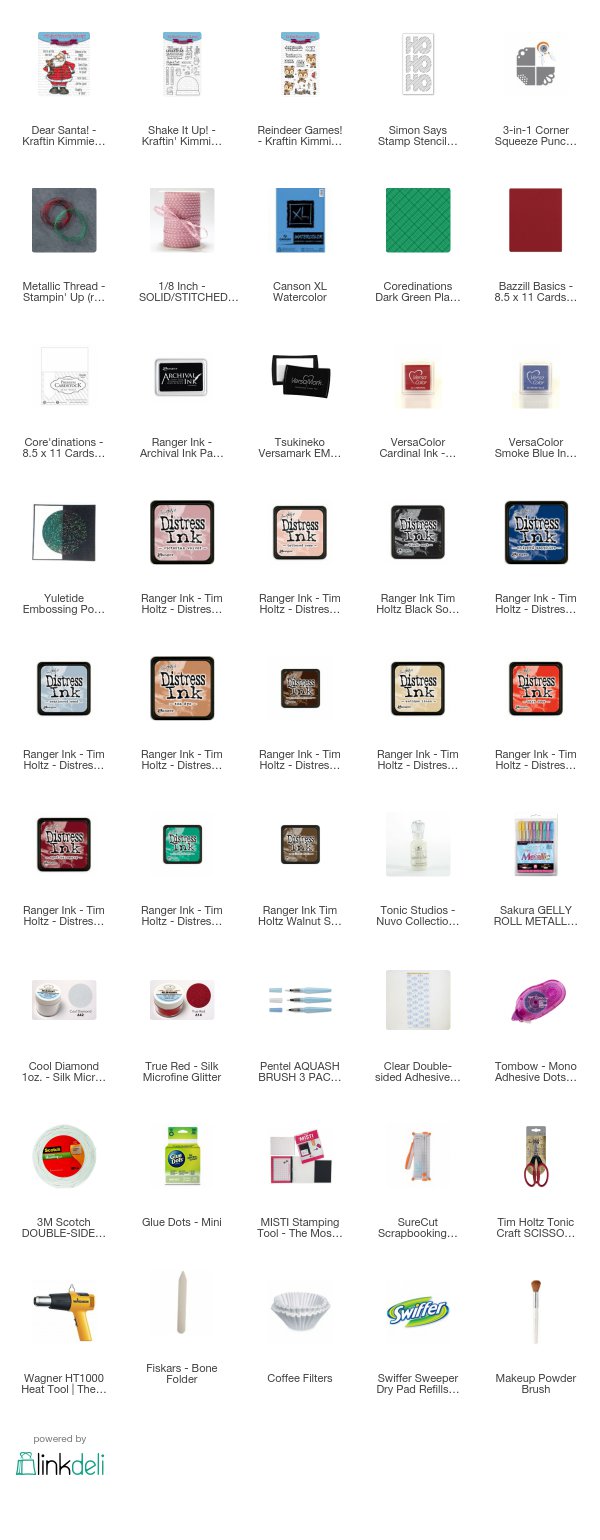
Supplies
Challenges
Kraftin' Kimmie Stamps Saturday: Stencil
Simon Say Stamp Wednesday: Furry Friends
Simon Says Stamp Monday: It's a Stitch Up
Addicted to Stamps and More: Holiday
Crafty Addicts: Christmas
Crafty Friends: Christmas
Creative Craft Cottage: Bow
Ching-Chou Kuik: Christmas
Crafty Hazelnut's Christmas Extra: Anything Goes
Crafty Hazelnut's Pattern Paper: Anything Goes

Fabulous card, beautifully presented along with a very clear explanation as to how you created it. Thanks for joining us at ATSM
ReplyDeleteElaine
Great card!
ReplyDeleteThanks for joining us at CraftyHazelnut's Christmas Challenge Extra for November!
Monica - DT
Such a pretty card, love the technique with the stencil and the glitter. Thank you so much for joining us at Simon Says Stamp Monday Challenge. Hugs, Sandra
ReplyDeleteWonderful card, great technique. Thanks for joining us at CHNC patterned Paper Challenge this month.
ReplyDeleteLove the glitter on the sentiment. Gorgeous card. Love it. Thanks for playing along Simon Says Stamp Furry Friends Challenge. Gayatri xx
ReplyDeleteFabulous card! Love this sweet Santa and the techniques that you used. Thank you so much for taking the time to create your gorgeous entry for our Ching-Chou Kuik monthly challenge. I hope you will enter again and also check out our Ching-Chou Kuik Facebook challenges as well. Have a fabulous day! Hugs, Gloria DT
ReplyDeletehttp://purpleglocreations.blogspot.com
What a stunning card you have made. Love the chubby Santa but the sparkly Ho Ho Ho is fab. Your card fits our challenge this month well of “Christmas/Winter”. Thanks for taking part and good luck. Best wishes, Kym (Ching-Chou Kuik Digital Stamps Design Team Leader).
ReplyDeleteThanks for taking the time to show us how it's done! It's a super effective card!! Thanks for joining us at The Crafty Addicts and Good Luck! :)
ReplyDeleteAnnabel - Crafty Addicts DT.