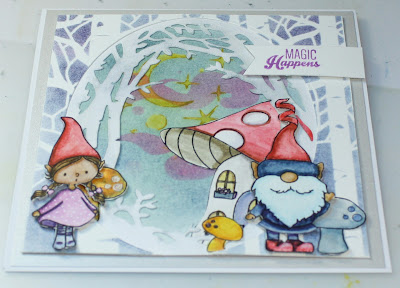
Magic happens deep in the forest where the gnomies live. For this scene I used 2 stamp sets, 2 stencils, 1 die set, 1 pack of crayons, 1 pack of markers, a few other inks, and a pair of scissors. It took a tad bit longer to make this card than it should have because I kept getting interrupted by life. But, the Magic Happens and the card came together.
Challenges
Kraftin' Kimmie Stamps blog Saturday Challenge: Magic!
Paperbabe stamps challenge: Picture Inspiration (mushrooms in a forest)
Crafting From The Heart: Anything Goes
Through the Craft Room Door: Anything Goes
Creative Moments: Anything Goes
Crafting From The Heart: Anything Goes
Through the Craft Room Door: Anything Goes
Creative Moments: Anything Goes
Supplies
Very recently I got my first pack of Distress Crayons and wanted to try them out.
I first used the Festive Berries crayon on their hats, swiping the crayon on one side and using the waterbrush to pull the colour to the rest of the hat.
For her dress, I scribbled the Seedless Grapes colour on to my work surface and used it like a palette to pick up the purple. For her hair I used Brushed Corduroy and Walnut Stain ink. For better contrast with her hair, I lighted up her face by just using the waterbrush to lift some of the colour. Hard to see here, but I used Tumbled Glass ink on his beard. I also used a bit of the markers to deepen the shadows on the hats and her dress.
I added white dots to her dress and the mushroom with white gel pen. I used Picket Fence marker to add highlights to the male gnome. I decided not to use the stump, squirrel or second small mushroom.
And then I decided they needed a home! I stamped on to some waterpaper cardstock.
I used a combination of the crayons, markers, and ink to colour the house. I didn't bother colouring the flowers on the sides of the rabbit looking in because I intended to cut them off or cover them.
I fussy cut the pile.
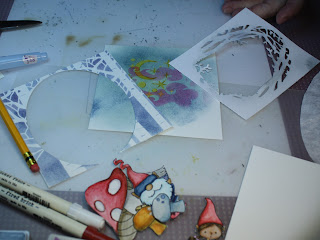
Using the TCW Aspens stencil I began making their background. I pounced Faded Jeans over the whole area and then some Picked Raspberries and Chipped Sapphire in spots.
I completely forgot to take a picture of the other stenciled background alone. I used Fossilized Amber crayon for the moon and stars Faded Jeans for the sky and Picked Raspberries for the clouds using the Hero Arts Dreamy Nights stencil.
I also die cut the forest frame with the die from the August My Monthly Hero kit using Elizabeth Craft Designs Soft Finish cardstock because it has a really nice look and texture.
I dry fit everything together and was pleased.
I trimmed all the background pieces so the layers would 'hide' behind my aspens.
The bottom layer is the sky scape with moon and clouds. I adhered the mushroom house directly to that layer, then the forest frame and two mushrooms, then the aspens with a mushroom on top.
I used foam mounting tape on both of the gnomes to give them some dimension from the background.
I added a sentiment, Magic Happens, to the front stamped with the Orchid cube from the Monthly Hero Kit.
Inside, I added a sentiment and stamped some hats at the bottom in red.


Beautiful card!! Thanks for joining our challenge this week with Kraftin Kimmie Stamps.
ReplyDeleteMarilyn DT
Love this so beautiful!!
ReplyDeleteInteresting, beautiful project. Love how you put everything together. Thanks for sharing your card on Creative Moment Challenge.
ReplyDeleteMarjeta