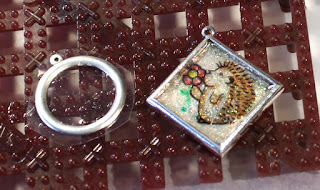
The stamps I used are the hedgehog and flower from from Hello Spring and the fishbowl from A Purr-fect Day! For the hedgehog, a diamond bezel and glitter behind. For the fishbowl, what better than a clear open bezel.
Supplies:
Kraftin' Kimmie Stamps: http://kraftinkimmiestamps.com/
Resin Obsession Super Clear Resin: http://goo.gl/kKNJgY
Nunn Design open ring: discontinued
2-sided diamond bezel: http://goo.gl/iiAXVz
Recollections glitter: from Michaels
Acetate sheet: recycled from packaging
Tim Holtz micro-serrated scissors: http://goo.gl/nbEO1Q
Staz-on jet black: http://goo.gl/fBKg0qChameleon pens: http://www.chameleonpens.com/
Slide bail: discontinued
Jump rings: http://goo.gl/iMhakL
I wanted the stamps to have a bit of transparency, especially the fishbowl, so I stamped black Staz-on on to a small sheet of acetate I recycled from packaging. I then flipped the image over and coloured it on the reverse with Chameleon pens. Colouring from the back, the pens never come into contact with the ink, so the alcohol in the pen doesn't wipe away the ink. Colouring from the back also adds a slight stained glass effect.
Since the fishbowl was destined for a circular bezel, I trimmed the acetate to be just smaller than the bezel opening and faintly coloured the background as well. The hedgehog and flower were loosely fussy cut so it would fit in the bezel with room all around.
To prepare the open circle for resin, I cut a clear piece of acetate the same size as the opening and attached it to a piece of clear packing tape and then adhered the open bezel over them. The packing tape was rubbed down to stick to the flat metal on the back to make a clear back to pour in the resin.
 While working on another resin project, the bezels got their first layer of resin. I added white shimmer glitter to the diamond.
Since the image was stamped on to acetate and not paper, I did not need to seal it. I slathered a small bit of resin on one side of the hedgehog and slid him in place on top of the glitter. Adding the resin to the image before sliding it in reduces the likelihood of bubbles between the resin and the image. I used a pair of tweezers to nudge the hedgehog into place and make sure he wasn't tipped over.
To add in the fishbowl, like the hedgehog, I put a small amount of resin in the bezel, slathered one side of the fishbowl image with a thin layer of resin, and slipped the image in place. Like the hedgehog, I had to nudge it a bit to get into the right place. An upside down or tipped fishbowl just would not do. I then added enough resin over the image to fill in the bezel on this side.
 To allow the images to be worn a pendants, they need bails for a place to slide the chain or cord through. I have a bunch of various types of bails, so it was just finding the right one to compliment the image then attach with jump rings.
For the hedgehog, a cord slide with a little filigree added just the right touch. I used a pinch bail with a pendant loop for the fishbowl.
All in all, I think they turned out pretty much as I envisioned. The only thing I would do over is to make the water and fish darker on the fishbowl.
Wearing the goldfish at my day job today (28 March 2016), I found out from a co-worker that a fish in a bowl is one of the symbols used for Persian New Year celebrations. How wonderful!


No comments:
Post a Comment
Thank you for your comments. I do read every one. Your comments help me to grow as an artist. It warms my heart to see wonderful comments and constructive criticism.